Saturday, April 14, 2018
Wednesday, April 11, 2018
Colors
Today I worked on the color grading of the film. I decided to go with a rather cool feel to it because it adds to the isolation mood that we are trying to go for, so I went for blue highlights and midtones, while keeping the shadows low. Small bit of advice; always color grade. No matter what it is, always make sure you play around with the colors to reach full potential.
Tuesday, April 10, 2018
Titles
Today I started playing with the titles of our film. A smoke machine was used in our film and the smoke is seen throughout the entire piece. From this, I got the creative idea to incorporate the smoke into one of the titles, and this is what I came up with. I wasn't sure if I was going to use this for every single title in the film, but then I realized that it was a little too extra and it would get repetitive if I did it for every title in the film, so I decided to just use it once. I looked up tutorials on YouTube on how to get this effect using Adobe After Effects. After a few minutes and a headache from using this software, here's what one of the titles will look like in the film
Monday, April 9, 2018
More Tweaks
Today Klaus brought in the foley sounds he recorded and we spent all class adding them into the final film, while also talking about the CCR and answering questions that we had. We were unsure if we should have the titles be something be super simple or go all out and have something cool. Oh well, nothing big today.
Sunday, April 8, 2018
Finishing Touches
Finally, the countdown for the deadline of this project is approaching. Surely it's a good thing, but it's also not. For us, it's not too big of a problem as we already finished editing. Right now, we are just playing with the color grading of the project to improve overall quality. I'm also trying to fix the title sequence while looking for better spots to have them in. Now the CCR... That's where it gets interesting.
I'm still trying to decide what I'm going to do for the CCR, since I really dislike being in front of the camera and I also hate hearing myself in voice overs. I'm sure I'll figure something out, but I don't have much time to do so. This is a pretty short post, but there isn't much to talk about at this point.
Friday, April 6, 2018
Owning it
Today consisted of making a list of some of the key elements we needed for our project. Elements such as the font for the titles, the list of sound effects we need to get, and the music and score for our film. Samuel and Nicolas used the site www.dafont.com to search for a nice, simple font that would work for the theme of our film. Klaus and I were looking over the footage making a list of the sound effects we needed to make while also trying to find a song to use.
Here's what we came up with for the list of sound effects we need to get:

Here's what we came up with for the list of sound effects we need to get:
- Drops of Water
- Boiling water
- Glass clinking
- Box Opening
- Tools (moving of the tools)
- Rope struggling
- Feet hitting the ground
- Footsteps
Yes, some of them sound very general and do not make a lot of sense. This list is mainly for us so we know what to get, we all understand exactly what we mean by looking at the list.
As for the music goes, I found a song on YouTube that seemed to be copyright free so I downloaded it. I was kind of skeptical about it so I looked into it a little more and it turns out that I needed to buy a license in order to use it freely. I went ahead and bought the standard license for $20 that allows us to use the song in our video. Here's a picture of the receipt/license

Thursday, April 5, 2018
Bumpy Roads
Like I said in my previous post... the most difficult part, editing. Why? simple. Try working with 4K footage on a laptop that isn't the strongest and has absolutely no space. At the moment, I can barely open Premiere without my computer lagging. Let alone open the project file. My teacher advised me to move everything into a hard drive, but I'm just so lazy to organize everything, I guess that one is on me. Editing this film is going to take a long time, and it's going to be very stressful. Specially when I get to the color grading portion of it.
Wednesday, April 4, 2018
The Beginning of the End
Here comes the difficult part... editing. Looking through over an hour of footage can be a very tedious task, but seeing how cool the shots look afterwards makes up for it. I will be using Adobe Premiere Pro CC as the preferred editing software to put this opening together. In addition to Premiere, I will do some of the title sequences in Adobe After Effects for animation purposes. I have certifications for Premiere Pro and have been using After Effects for a couple of years now, so editing shouldn't be a problem for me.
I'm one of those people who love editing to the beat. All of my videos have to be synced to some kind of music; but for this project, it's going to be a little more complex than that. Today, we got started with the first rough draft of the edit. We cut and put some clips together without any real editing done to it just to test the timing and composition of the clips. I added one of the songs we'll be using as a placeholder to help the flow of editing a bit. I aim to be done with the first rough draft of the edit in the next couple of days to see if we need to include or drop anything, and get started with the actual edit. Here are some screenshots of the timeline so you can have a little tease of what the footage looks like.


I'm one of those people who love editing to the beat. All of my videos have to be synced to some kind of music; but for this project, it's going to be a little more complex than that. Today, we got started with the first rough draft of the edit. We cut and put some clips together without any real editing done to it just to test the timing and composition of the clips. I added one of the songs we'll be using as a placeholder to help the flow of editing a bit. I aim to be done with the first rough draft of the edit in the next couple of days to see if we need to include or drop anything, and get started with the actual edit. Here are some screenshots of the timeline so you can have a little tease of what the footage looks like.


Saturday, March 31, 2018
Little Tease...
Here's a little sneak peek of what our footage looks like. I'm sure this footage is going to look twice as good as soon as we throw in some colors and the black bars, that for some reason make everything look better.


Wednesday, March 28, 2018
What's in my Camera Bag?
Before I get into the main idea of this post, I want to make it abundantly clear that having all this crazy, expensive equipment is in no means necessary for making a film. We could've easily shot this film opening by simply using our iPhones. All it takes is a great understanding of camera shots, angles, composition, lighting techniques, and creativity. Personally, I feel more comfortable shooting with my DSLR as I've been doing so for the last 4 years. Now that that's out of the way, allow me to show you some of the equipment we used for this film.
The Brain
- For this project, we decided to use my camera, a Sony A7SII. By using this camera we were able to shoot at 120fps, which would allow us to slow down the clips up to 20% of the normal speed without ruining the quality of the clip.

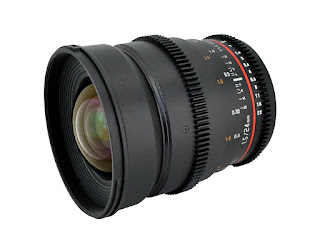
The Eyes
- For the lens, I used what seems to be my favorite lens, the Rokinon 24mm. This lens takes the spot as my favorite one because of it's manual aperture capability. Just like the focus ring, this lens has another ring that allows you to open and close the aperture manually on the spot. This makes it extremely easy to fix the shot when the lighting condition changes. It is also a pretty wide lens that allows for more field to be covered.
 The Mouth?? Ears??
- I did have a Rode VideoMic Pro microphone mounted on the camera to help pick up some of the NATs. Although we won't be using much of them on the final project, it is always nice to have them in case we want some specific sound effects.

We also used a tripod along with a dolly to get some nice tracking shots. Again, none of this equipment is necessarily needed in order to make a film. This is just what we are comfortable working with.
The Brain
- For this project, we decided to use my camera, a Sony A7SII. By using this camera we were able to shoot at 120fps, which would allow us to slow down the clips up to 20% of the normal speed without ruining the quality of the clip.

The Eyes
- For the lens, I used what seems to be my favorite lens, the Rokinon 24mm. This lens takes the spot as my favorite one because of it's manual aperture capability. Just like the focus ring, this lens has another ring that allows you to open and close the aperture manually on the spot. This makes it extremely easy to fix the shot when the lighting condition changes. It is also a pretty wide lens that allows for more field to be covered.

- I did have a Rode VideoMic Pro microphone mounted on the camera to help pick up some of the NATs. Although we won't be using much of them on the final project, it is always nice to have them in case we want some specific sound effects.

We also used a tripod along with a dolly to get some nice tracking shots. Again, none of this equipment is necessarily needed in order to make a film. This is just what we are comfortable working with.
Tuesday, March 27, 2018
One Alpha Take One... Action!
Production day is here! Today we shot the entire project from start to finish. We met up at Klaus' house at around 10 A.M and did not leave until we were done with the project. Klaus built both parts of the set that were used in his garage. It wasn't too difficult of a task to make it look like it wasn't shot in the same place due to our great use of lighting and composition. During the shoot, we ran into a couple of problems with the story as we realized that we weren't going to be able to achieve some of the shots we had planned to, therefore ruining the entire ending we had thought of. We took a break from shooting to brainstorm and plan a different ending that worked with what we had available and are confident that it's gonna work out in the end.


We played a lot with the lighting and fog machine to make the place look creepy and dark. It may seem all over the place from the pictures, but just wait until you see what the shots look like. Both "sets" were right next to each other, but with the right angles and composition, you won't be able to tell that they were shot in the same room.

Friday, March 23, 2018
Set Design
We're gonna be shooting the entire project in Klaus' garage. Klaus has a great understanding and is very skilled building sets with the materials he has at home. Previous to this project, we shot a music video in the same place and the outcome was great. I'm excited to see what Klaus does for this set. Below are some pictures of what the space looks like and some tools we will be including in our video.
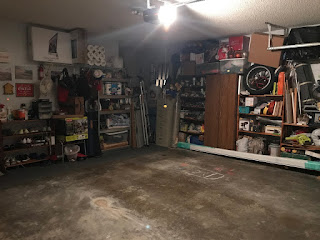


In the first picture, you can see what Klaus' garage looks like. I will provide a picture update during our production day to see what the place looked like after Klaus does his thing. In the second picture, you can see a lot of tools that are also part of Klaus' garage. We have a little scene in our film opening that includes these tools. The last picture is an example of what Sam is going to be wearing during production, as he is the creepy scientist of the film. Pretty simple stuff, just wanted to keep everyone updated.
Tuesday, March 20, 2018
Time Management
I've learned over the past years of making weekly videos, that the most important process of making any type of video, is the planning behind it. That being said, my partners and I decided to spend a lot of our time planning everything out for the shoot.
We began by listing the things we would need in order to execute this shoot. Some of the things included in the list were:
- Laboratory Flasks
- Laboratory Beakers
- Lab coats
- Fog Machine
- Tools
- Black backdrops
- A dark room
...and the list goes on. Immediately, after finishing the list of all the props and materials needed for this film, we agreed on production dates that worked for all of us during spring break. We picked 3 different dates to be able to overshoot as much as we could and get everything we needed in case we previously forgot to do so. Our proposed days of production are March 26th, 27th, and 28th. We will now begin to work on our storyboard for this shoot.
Saturday, March 17, 2018
Partial Storyboard and Other Visual Examples
Below are some pictures of what we have done as far as the storyboard goes. We have included where the titles are going to be and how they're going to look.


As you can see, we are not the best artists out there, and you really don't have to be in order to have a working storyboard. The graphics should be good enough to help you and the rest of the crew visualize the scene and find problems before they even occur. This also saves a lot of time during the time of production, this way you're not stuck trying to figure out how you want a scene to look.
In all honesty, I'm not one to stick to and rely on these sheets. Whenever I'm on the field shooting, I'll always come up with different things to add in or some other things to replace, but they are always extremely handy at the time of production.
Monday, March 12, 2018
Scheduling
Today, while still trying to complete and perfect our planning, we worked on a schedule that we are going to try and follow for the completion of this project. This is completely subject to change and may do some things earlier and some things later. This will give us an idea on how to pace ourselves. Here's what our schedule looks like
- start brainstorming
- start thinking of plot
- conduct research on chosen genre (thriller/suspense)
Week 2: (3/5-3/11)
- keep brainstorming/float ideas
- begin planning
- brainstorm title
Week 3: (3/12-3/18)
- start planning logistics for shoot
- complete the plot for Week 4
Week 4: (3/19-3/25)
- finalize details of film opening
- finish storyboard
- gather any remaining items necessary for shoot
Week 5: (3/26-4/1)
- shoot opening
- begin editing
Week 6: (4/2-4/8)
- edit, revise any necessary portions of opening
- re-shoot if we are missing anything
Tuesday, March 6, 2018
Inspiration
Since the beginning, we knew we wanted the film opening to be very dark. We started brainstorming ideas about what we could do with dark rooms. Not your typical photograph-developing dark room, I'm talking about an actual room that's very dark.
Klaus suggested a very cool example from the Netflix show Stranger Things. It displays one of the main characters in what seems to be a completely black room, otherwise known as the void. I thought this was a great example but I didn't want to base our film off of that, so we started looking other places while keeping a tab on his example.

I watch a lot of horror and suspense movies, so I had an idea of how I wanted it to look; but I couldn't find the perfect example for it. We started watching YouTube videos and eventually we found a film that greatly highlights some of the features we want our film to have. Here's the the link to the film opening for Resident Evil, pretty much our inspiration for our project.
Resident Evil Film Opening
Monday, March 5, 2018
Rough Draft...
what we have so far is a suspense film that keeps the viewer on edge. We are going to start off with our main actor tied up to a chair in a empty room. There is nothing in the room except for him and a table in front of him with a bunch of tools and a box. The actor manages to get out of the chair and walks out of the room into a very bright hallway that seems to be like a laboratory. He sees a bunch of scientists and hides behind a table, he turns around for a second and knocks over a test tube and it shatters. All the scientists look over and it ends.
Saturday, March 3, 2018
Suspense it is
After careful consideration, our group decided to go with the suspense route for our film opening. We chose suspense as we like the idea of working with lighting, dark surroundings, set design, and what better way to put all those things to use than making a suspense film? We wanted the viewers to feel intrigued when watching our video, and most importantly provide the audience with a nice cliffhanger that will leave them wanting more.
We decided to center our opening around audio, or lack thereof. In our film, we decided to incorporate no dialogue. This technique creates a sense of tension for the viewer. This tension rises as the music changes and the sound gets more intense.
Our plot as of now is not set in stone, and we do not know how long it will take us to seal it off. This is because a project this big demands a lot of pre-production. Surely, this is going to be a great challenge for me, as that is the area I'm the least skilled in.
Friday, March 2, 2018
Quick Introduction
Hello! My name is Jose Cabrera and I'd like to welcome you to my blog. I am an 18-year-old aspiring filmmaker with a little twist. My passion does not revolve around watching films, reading and learning about directors and other professionals, and I'm certainly not much of a writer. My passion revolves mainly around the practical side of things; working at location with lights, props, set design, etc. I love picking up a camera and just filming everything that catches my eyes, in hopes that I can create something that catches yours.
That being said,with the help of 3 classmates, I would like to create a 2 minute film opening in which we allow ourselves to get creative with the use of lights, props, and a cool set design to create a scene that delivers a feel of suspense and thrill to the viewer. I will try and document every step involved in creating this film so that you can be as involved as I am with this project.
That being said,with the help of 3 classmates, I would like to create a 2 minute film opening in which we allow ourselves to get creative with the use of lights, props, and a cool set design to create a scene that delivers a feel of suspense and thrill to the viewer. I will try and document every step involved in creating this film so that you can be as involved as I am with this project.
Subscribe to:
Posts (Atom)